

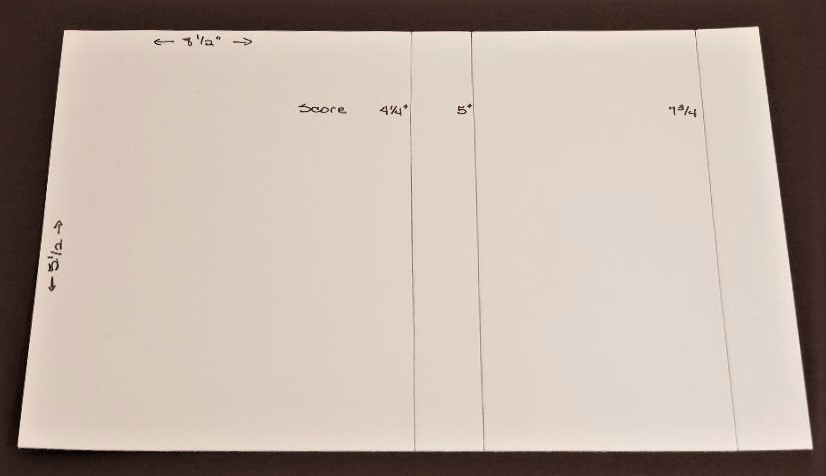
Dimensions:
Card Base: 8
½” x 5 ½”, scored at 4 ¼”, 5”, 7 ¾”.
Gingham dsp:
One piece measuring at 5 ½” x 2 11/16th, or a smidgen under 2 ¾”. Also, two pieces measuring at 5 ½” x 5/8”.
Inside piece
– Whisper White 5 ¼” x 2 ½”
Extras: Scrap Whisper White cardstock
Other items used: Stamps:
Tea Together, Amazing Life, Meant to Be, Itty Bitty Birthdays –
Cardstock: Balmy Blue, Grapefruit Grove, Call Me Clover, or Highland Heather –
Ink: Memento Black – Blends: Calypso Coral light and dark, Balmy Blue light,
Call Me Clover light, Mint Macaron light, Highland Heather light and dark –
Extras: Ribbon, Stitched Rectangle, Tea Together dies.
Instructions:
- Cut cardstock base and score using dimensions above. Fold cardstock at scored lines. This will create your card! Here is a closer view of the dimensions.
- Add ribbon to the largest piece of Gingham designer paper. Add to the front of the card using adhesive. The larger piece will be in the center and the smaller pieces are above and below the larger piece. The designer paper should not go over the fold lines. It is easier to fold.

- Stamp sentiments and die cut with the Stitched Rectangle framelits. I used the second from the smallest rectangle for the “Just for You”. Add to the base of the card using dimensionals. This will be your stopper.
- Stamp, die cut, color and add cup and teapot to the card using mini glue dots.
- Stamp and die cut sentiment for the top of the card. I used the smallest rectangle for this. Add a bow using mini glue dots.
- Stamp sentiment on the 5 ¼” x 2 ½” Whisper White cardstock and add to the inside of your card. Have fun!

Instructions for stamping the
inside of your teapot and cup:
- Stamp the teacup and teapot images on a scrap piece of 4 1/4" x 5 1/2" Whisper White cardstock. Cut out the inside of the images using snips. This will create the mask below. Place your die cut teapot on the Stamparatus and add your mask on top of the image so the mask covers everything except the open area you want to stamp. Place the magnet on top to keep the mask from moving. Stamp your images with flowers and the three-dot stamp using Memento Black ink. Remove the mask. Color in the teapot using blends.


